AI Assistant: Examples and Tips
This page covers the day-to-day use of the AI Assistant with plenty of real-world prompt examples to get you started quickly.
Opening the AI Assistant
Section titled “Opening the AI Assistant”-
Open or create a project in Paquet Builder.
-
Click the AI Assistant button in the Project Edition ribbon toolbar.
-
The assistant opens as a floating window that you can move and resize freely.

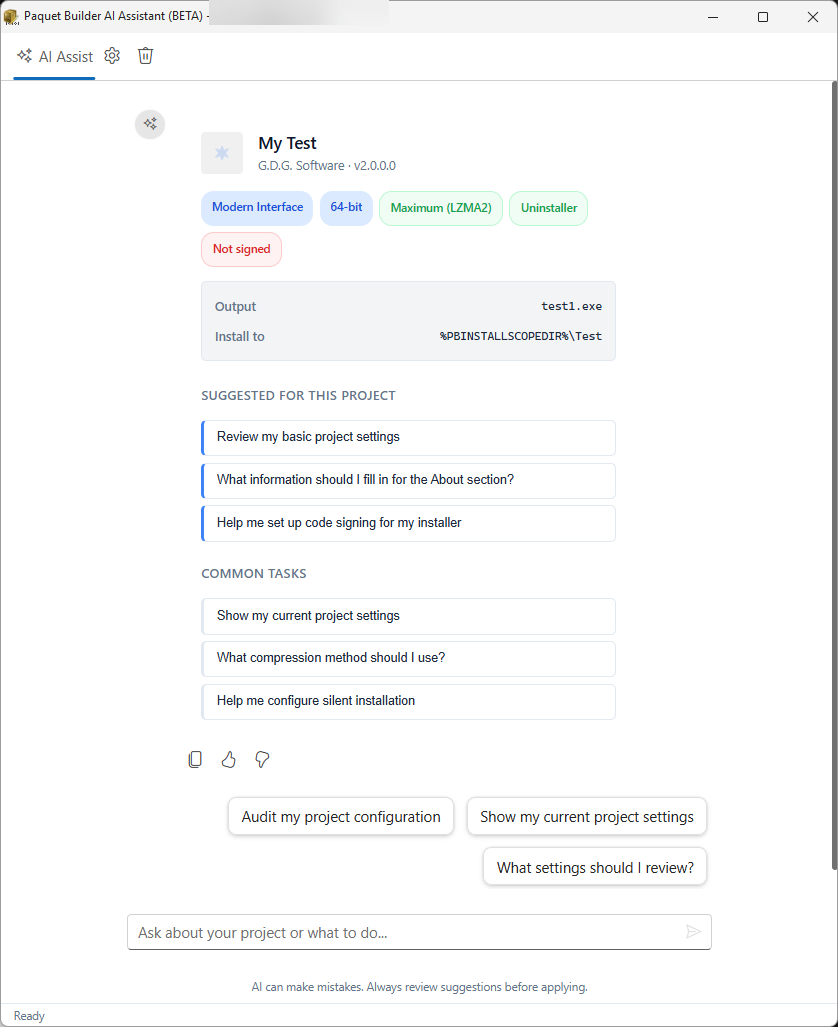
The Welcome Screen
Section titled “The Welcome Screen”When you open the assistant with a project loaded, it displays a contextual welcome screen with:
| Element | Description |
|---|---|
| Project summary | Name, company, version |
| Status indicators | Interface type (wizard/standard), architecture (32-bit/64-bit/ARM64), compression, signing, encryption |
| Output details | Output file path and installation directory |
| Suggested prompts | Context-aware suggestions based on your current settings page and project state |
| Common tasks | General-purpose suggestion chips for frequent operations |
The welcome screen refreshes each time you re-open the assistant and clears automatically when you send your first message.
Prompt Examples
Section titled “Prompt Examples”Here are dozens of example prompts organized by category. You can type these (or similar requests) directly in the AI Assistant chat.
Package Configuration (About Your Package)
Section titled “Package Configuration (About Your Package)”“Change the package title to My Application 2.0”
“Set the company name to Acme Software and the email to [email protected]”
“Update the product version to 3.1.0 and the file version to 3.1.0.0”
“Make this a wizard-style installer instead of standard”
“Set the destination folder to %PROGFILESDIR%\Acme\MyApp”
“Change the package icon to C:\MyProject\resources\app.ico”
Compression Settings (Compression Options)
Section titled “Compression Settings (Compression Options)”“Enable LZMA2 compression with ultra level”
“Use 4 CPU threads for compression”
“What compression settings do you recommend for a 2 GB installer?”
“Switch to solid compression for smaller file size”
“Disable compression entirely”
“Enable digital signing with my PFX file at C:\certs\mykey.pfx”
“Set up SHA-256 only signing (no dual signing)”
“Configure Azure Artifact Signing with endpoint https://eus.codesigning.azure.net”
“Enable signing for both the installer and uninstaller”
“Set up JSign with my Azure Key Vault”
Building and Testing (Package Output)
Section titled “Building and Testing (Package Output)”“Compile my project”
“What errors did the last build produce?”
“Do a quick test build”
“Open the output folder”
“Save my project”
Files and Components (File Manager / Components)
Section titled “Files and Components (File Manager / Components)”“Show me all components in my project”
“Create a new component called Documentation with description ‘User guides and manuals’”
“Link the Plugins component to C:\MyProject\plugins with subfolders enabled”
“Add a file mask to exclude *.pdb and *.log files from the Main component”
“What files are in the Documentation component?”
“Remove the Extras component from my project”
Variables and Localization (Variables / Resource Strings)
Section titled “Variables and Localization (Variables / Resource Strings)”“Add a boolean variable called INSTALL_PLUGINS with default value 1”
“List all my project variables”
“Translate all resource strings to French and German”
“Add a new resource string #WelcomeText with value ‘Welcome to the installer’”
“What languages are configured in my project?”
Installation Scope (Installation Scope)
Section titled “Installation Scope (Installation Scope)”“Set the installation scope to User Choice so end users can pick”
“Configure per-user installation (current user only)”
“What is the current installation scope?”
“Enable UAC elevation for all-users installation”
Custom Actions (Action Manager / Action List)
Section titled “Custom Actions (Action Manager / Action List)”“Add a shortcut on the Desktop after file extraction pointing to %DESTPATH%\MyApp.exe”
“Create a registry key HKCU\Software\Acme\MyApp with a Version string value set to 2.0”
“Add a condition to check if .NET 8 Runtime is installed before extraction”
“Show me all actions in the After Extraction event”
“Add a license agreement dialog before file extraction”
“Disable all actions in the Finalization event”
“Create an environment variable MYAPP_HOME pointing to %DESTPATH%“
Navigation
Section titled “Navigation”“Open the compression settings”
“Open the File Manager”
“Open the Custom Actions editor”
“Go to the digital signature settings”
“Show me the installation scope settings”
Project Information
Section titled “Project Information”“Show me a summary of my project settings”
“What is the current output path?”
“What architecture is my package targeting?”
“Is my installer digitally signed?”
“How many files are in my project?”
Troubleshooting and How-To
Section titled “Troubleshooting and How-To”“Why is my installer requesting admin rights?”
“How do I make a silent installer?”
“How do I create a multi-language installer?”
“What is the difference between LZMA and LZMA2?”
“How do I add an environment variable during installation?”
“How can I check if a process is running before extraction?”
Reviewing and Applying Changes
Section titled “Reviewing and Applying Changes”When the AI proposes changes, they appear as action cards in the chat:
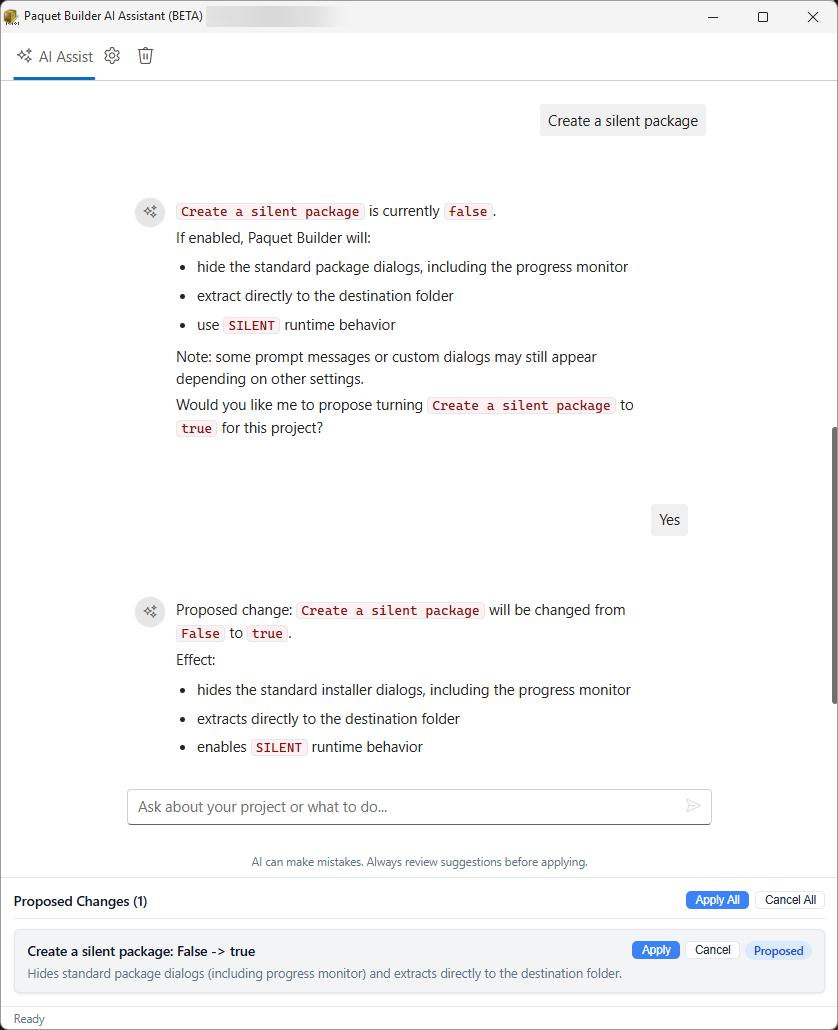
Each card shows:
- What will change (setting name, component, action, etc.)
- The proposed value
- Apply and Cancel buttons
Click Apply on a specific card to accept that change, or Cancel to reject it.
Use Apply All to accept every pending change at once, or Cancel All to reject them all.
Context-Aware Suggestions
Section titled “Context-Aware Suggestions”After applying changes, the AI may display follow-up suggestion chips, which are clickable prompts for related tasks. For example:
| After… | Suggestions |
|---|---|
| Adding a component | ”Link a source folder to this component”, “Set a file mask” |
| Enabling signing | ”Configure the timestamp server”, “Sign the uninstaller too” |
| Adding a shortcut | ”Add another shortcut”, “Set the shortcut icon” |
Click any chip to send it as your next prompt.
Tips for Best Results
Section titled “Tips for Best Results”-
Be specific. “Set LZMA2 compression with ultra level and 4 threads” works better than “make compression better”.
-
Navigate first. Open the relevant settings page before asking. The AI detects your current page and provides targeted suggestions.
-
Use screenshots. Ask the AI to capture a screenshot when you need help understanding a visual element.
-
Ask follow-up questions. The AI maintains conversation history, so you can refine your requests incrementally.
-
Ask how-to questions. The AI searches the official documentation to give accurate answers.
-
Use both languages. The AI understands prompts in English and French.
Dark and Light Theme
Section titled “Dark and Light Theme”The AI assistant window follows your application theme automatically. Switch themes in Paquet Builder and the assistant adapts instantly.
Clearing the Conversation
Section titled “Clearing the Conversation”Click the clear button to reset the conversation history and all pending action cards. The welcome screen reappears with updated project information.