Setting Up the AI Assistant
The first time you open the AI Assistant, the settings dialog appears automatically. You can also access it later by clicking the gear icon in the AI Assistant window.
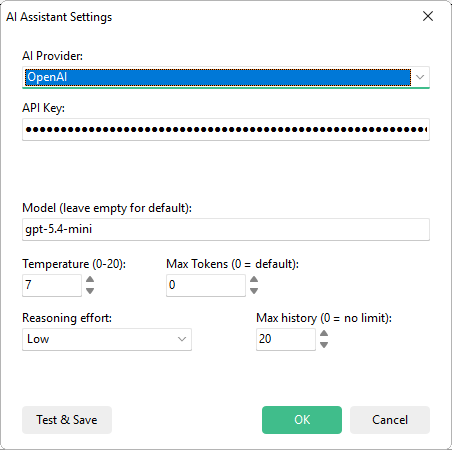
Quick Setup
Section titled “Quick Setup”-
Choose a provider from the dropdown list (see available providers below).
-
Enter your API key from your provider’s website into the API Key field.
-
Select a model or leave empty to use the provider’s default.
-
Click OK. You’re ready to chat with the AI Assistant.
Available Providers
Section titled “Available Providers”Cloud providers require an API key and an internet connection. They offer the most capable models.
| Provider | API Key Required | Sign-Up |
|---|---|---|
| OpenAI | Yes | platform.openai.com |
| Anthropic (Claude) | Yes | console.anthropic.com |
| Google (Gemini) | Yes | aistudio.google.com |
| Grok (xAI) | Yes | console.x.ai |
| Mistral | Yes | console.mistral.ai |
| DeepSeek | Yes | platform.deepseek.com |
Local providers run on your machine: no API key needed, no data leaves your computer.
| Provider | API Key Required | More Info |
|---|---|---|
| Ollama | No | ollama.com |
| LlamaCpp / LM Studio | No | lmstudio.ai |
For setup instructions, see Using Local AI Models.
API Key Security
Section titled “API Key Security”Choosing a Model
Section titled “Choosing a Model”Enter the model name in the Model field. If left empty, the provider’s default model is used.
For a detailed comparison of all providers and models, see AI Providers and Models.
Advanced Settings
Section titled “Advanced Settings”Controls response creativity on a scale from 0.0 to 1.0. Default: 0.7.
| Range | Behavior | Best For |
|---|---|---|
| 0.0 – 0.4 | Deterministic, consistent | Precise configuration tasks |
| 0.5 – 0.7 | Balanced | General usage |
| 0.8 – 1.0 | Creative, varied | Brainstorming and exploration |
Maximum response length. Leave at 0 to use the provider’s default limit.
Only increase this if responses are being cut off.
Number of previous messages included in context. Default: 20.
| Value | Effect |
|---|---|
| Lower (5–10) | Saves tokens and reduces costs |
| Default (20) | Good balance for most tasks |
| Higher (30+) | Better multi-turn context retention |
| 0 | Unlimited history (not recommended for long sessions) |
Controls thinking depth for OpenAI’s o-series and GPT-5 models.
Options: Default, None, Minimal, Low, Medium, High.
Mock Mode
Section titled “Mock Mode”When no API key is configured, the assistant automatically runs in mock mode with simulated responses. This lets you explore the interface and understand the action card workflow without connecting to any AI provider.
Independent Storage
Section titled “Independent Storage”AI settings are stored separately from your project files and main Paquet Builder preferences. Switching projects does not affect your AI configuration.
| File | Contents |
|---|---|
%APPDATA%\GDG Software\Paquet Builder\pbprefer.xml | Provider, model, and advanced settings |
%APPDATA%\GDG Software\Paquet Builder\aikeys.cfg | Encrypted API keys |