Overview of Components
Components are special categories that you can define in order to group related files together. You can have as many components in a package as you want. Each component has a name, an optional description, a unique custom variable that determines whether the component is installed or not, and a file list that of course indicates the files grouped into the component.
Components are useful if you want to group files together (for example you can group picture files into a component called "Images") or in case you want to let end users decide the components that should be installed on their computer.
If you do not want to create additional components, just use the "main" component to specify your package files.
Warning
Packages must at least contain one component called "Main". This component cannot be removed nor renamed; when a new project is created, it always contains the "main" component. However, working with the "main" component is optional: you do not have to add files to this component (it only needs to exist).
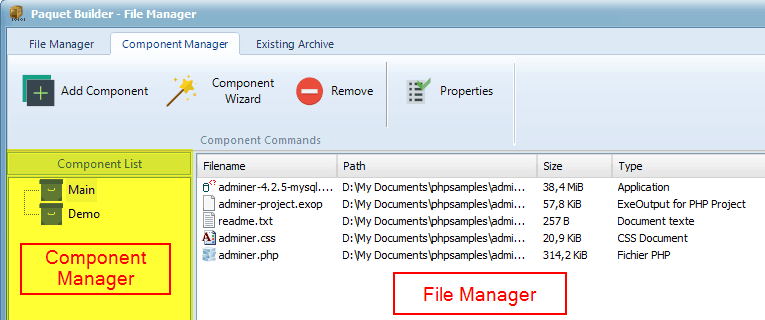
Components can be created, removed or edited using the component manager (list on the left) from the file manager window:
Component Properties
To edit the properties of a given component, highlight its title in the component list and press the Properties button  (or double-click the icon). The following window will appear:
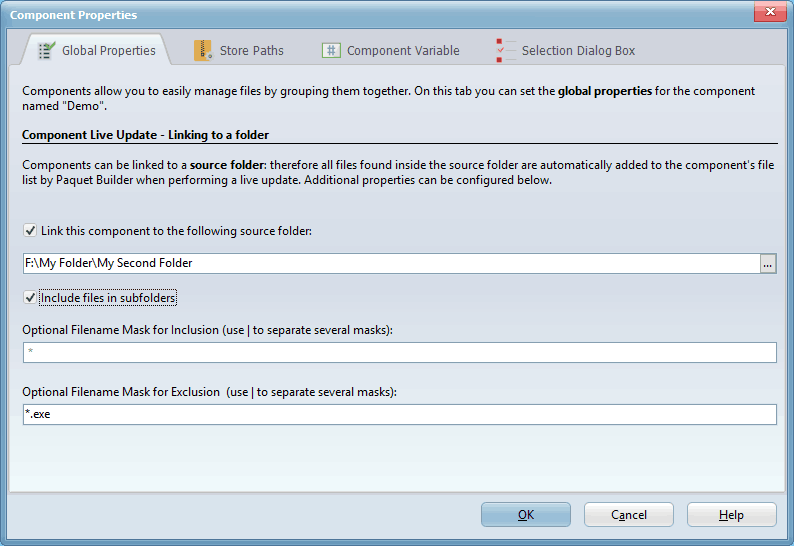
This window contains three tabs: "Global Properties", "Component Variable" and "Selection Dialog".
Global Properties
Component Live Update (synchronization)
Paquet Builder supports linking a component to a source folder. This means that the contents of the source folder will be considered as the contents of the component; in other words, all files found in the source folder will be automatically added to the component's file list, and all files not found will be removed from the file list (optional) when the component is refreshed. It is a synchronization.
This feature is useful if you want Paquet Builder to automatically manage its file lists according to the contents of the source folders. For instance, if you add files to a source folder, you do not need to also add these files to the component file list manually: just click the "Live-Update" button and let Paquet Builder synchronize the file lists for you.
Clicking the "Live-Update" button causes Paquet Builder to refresh all source-linked components. But you can also only refresh one component using the mouse context menu: select the component to be refreshed and right-click to display the context menu, then use "Live update this component".
Live update always adds new files, but it can also remove files from the lists if the source files do not exist anymore. You can disable this behavior in the Environment Options. If files still exist, they are not removed.
If you want to reset the full file list from scratch, right-click on the file list, choose "Clear file list" and finally, click Live-Update.
Info
Paquet Builder displays a missing icon when a file is not found.
Include files in subfolders
If enabled, Paquet Builder adds files from the selected folder and all files from its sub-folders. This operation can be called a "recurrence". In other words, this option determines whether subdirectories will be traversed to look for more files when scanning the source folder.
Optional Filename Mask for Inclusion (use | to separate several masks):
Lets you determine whether a file should be added to the file list if its file name conforms to the format specified by a mask.
About masks
Each literal character must match a single character in the mask. The comparison to literal characters is case-insensitive.
Wildcards are asterisks * or question marks ?. An asterisk matches any number of characters. A question mark matches a single arbitrary character.
If you have several masks, separate them with a | pipe character.
Examples
*will include any file.*.exewill include any file with.EXEextension.*.exe|*.dll|*.xlswill include any file with.EXE,.DLLor.XLSextensions.ab?.txtwill include for instanceaba.txt,abb.txt,abc.txtand so on...
Optional Filename Mask for Exclusion (use | to separate several masks):
Same as before, except that this is for excluding files based on one or several file masks. In that case, the file is not added to the file list if its filename matches the format specified by the mask.
Storing Path Information
If your source files come from different source folders, then the path in addition to the filename of each file should be stored within the archive. When a file is unpacked, the folder corresponding to the stored path is first created and then the file is placed in it.
Paquet Builder already provides global path information storing properties but if your files come from different folders, you may override these global settings using "local" ones related to the component.
By default, the "Use the default settings..." option should be turned on. Recommended most of the time (and for beginners).
If you do not want any path information to be stored (only filenames), then select the second option "Do not store path information". In this case, ensure you will never have source files with the same filename!
"Keep path information relative to the following root folder" is the last option and it works exactly as the "relative paths" option in the Compression Options page. Except that the root folder can be different. Use this option if the source files of the component come from the same folder (or its sub-folders); in this case, you can use this folder as the root folder.
Component Variable
Warning
Be sure to read the help topics related to variables before continuing.
Each component has a unique Boolean custom variable that can be set to either "1" (true) or "0" (false). When a component should be installed (i.e. its files may be extracted), the variable of that component is set to "1" (true). Otherwise the variable is set to "0" (false) and no file is extracted.
Component variables should always begin by VCOMP, and once a component is created, its associated variable is automatically listed in the Variable Manager.
The value of a component variable can be set by end users thanks to the "Select Components" dialog or by the package itself thanks to custom actions (especially with the "perform operation on a variable" action type).
Install the component by default
This option indicates whether the component should be installed or not by default: if the option is enabled, the component variable will be initialized to "1" (true) so, unless you change the variable's value yourself, the component will be installed. If you disable this option, the component will normally not be installed unless you change the value of its associated variable.
By default, always leave this option turned on unless you do not plan to use the component ("main" for example) in your package.
Selection Dialog Box
This tab contains properties related to the component selection dialog box only. If you do not plan to use this dialog box in your package, then you do not need to configure these options.
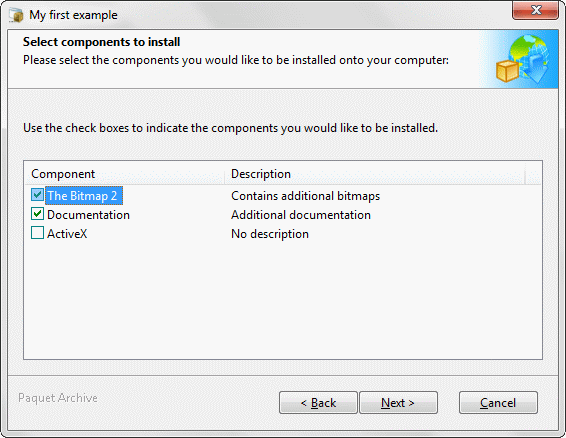
The component selection dialog box displays a list of check boxes that let your users select the components they want to be installed on their computer. They can read a description of a given component and decide whether the latter should be installed or not by turning on/off its checkbox as you can see below:
Component Title
The component title may be different from the component name (which identifies the component and will never be displayed to end users). The component title appears near the check box and consists in a short phrase that describes the group of files belonging to it, such as "Help files", "Additional Movies"...
Component Description
The component description may be used to provide end users with a further description of the component and its files. "This will install the help system files and additional documentation files." is an example of what you can enter.
Info
Resource strings are allowed for these two fields.
Allow users to decide whether the component will be installed or not
If you disable this option, then the component will not appear in the selection list at all. End users cannot consequently decide whether the component will be installed or not.
Required component: it must be installed
If you want your end users not to change the state of the component (whether it will be installed or not) and the component to remain in the selection list (the option above is not turned off), then enable this option. In this case the check box related to the component will be disabled (grayed). You can see on the previous screenshot that the "Main Files" component is required.
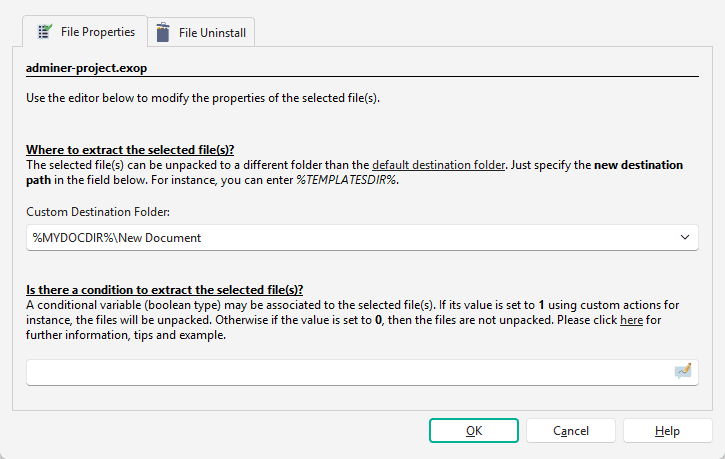
Custom Destination Folder for Files in Components
Components don't have a custom destination folder. If you want to set a different destination folder for the files of a component, you should select all these files and set their Custom Destination Folder thanks to the help of File Properties (screenshot below).